Design
Every iAVs is identical to another in terms of its basic component parts and operating method – from a square metre to a million square metres.
We’ve provided three system designs – each of them authentic iAVs – with the only difference being their size.
It all comes down to your needs, preferences and resources.
Before we dive into that, however, there are a few things to bear in mind as we proceed.
Things to Consider
The following factors are applicable to any type of gardening – and are not meant to overwhelm you. They’re simply a handful of things to keep in the back of your mind as you set out to design your iAVs Sandgarden.
Location

In setting up a garden, it’s vital that the plants receive sufficient light, so ensure that your proposed space receives sunlight of adequate intensity and duration. Plants cannot receive too much natural light.
While iAVs is very well suited to off-grid operation, most people will opt to use 120/240-volt pumps and timers (at least initially) so access to electricity is important, too. In impoverished remote locations manual (non-electric) operation is also feasible.
Water is heavy so we don’t want to carry too much of it. Ensure that your proposed build site has convenient access to suitable water.
If you have experienced floods on your property – or anticipate them – think about where your sandgarden is going to be most secure.
Sustainability
Herbicides, pesticides and other industrial chemicals will kill your fish and have no place near an iAVs sandgarden. The planet is well overdue for a respite from poisoning so cut it a break and use materials with the lowest possible environmental impact – or those that can, at least, be fully recycled.
Durability
Your choice of system components should take their lifespan into account. Budget constraints aside there is no practical substitute for quality. While best-quality components are typically more costly they are invariably the most cost-effective and reliable choice over the long term
Aesthetics
Whether you get to engage in food production may require that you satisfy your partner that you are not going to create an eyesore in your backyard.
Similarly, your neighbours may begin to take an unhealthy interest in your system if they perceive that their property values are negatively impacted by your activities.
You may argue that what you do in your own backyard is your business, but local government authorities will take a different view if they start receiving complaints from disaffected neighbours.
A neat and tidy system is also easier to operate and keep clean.
Nuisance Potential
The sound of running water might be music to your ears but could well drive a neighbouring shift worker to distraction. Locating your system out of the hearing range or neighbours will avoid this issue.
Nothing will bring the wrath of the local health inspector down on your head faster than something that stinks or attracts vermin. Managing your system in a hygienic state is essential. Fortunately, this is easy with an iAVs sandgarden.
To repeat, don’t let these considerations distract you from building an iAVs Sandgarden. They apply to all forms of gardening so just keep them in the back of your mind as we get on with the process of designing and building your first sandgarden.
iAVs Layout Options
Gravity is Good!
The classic iAVs approach is to position the sand biofilter so that it drains directly back into the fish tank. Not only is this arrangement simple to execute but it only requires a single water pump. With next to no plumbing it has minimal points of failure.

The pump, located in the fish tank, moves water up to the sand bed. The water then percolates down through the sand and drains back into the fish tank.
The advantages of this arrangement are that it’s easy to understand – and similarly easy to build and operate.
Having the pump located in the fish tank affords its own advantage in that the solids are macerated as they pass through the pump which causes them to be more evenly distributed throughout the furrows.
Note: This is seen as a disadvantage in basic flood and drain media beds filled with gravel/clay pebbles but macerated solids are not an issue in iAVs because of the much greater effectiveness of sand as a filtration substrate.
To be clear, this is the preferred layout method wherever possible.
That said, there are those situations where it may not be desirable (or even possible) to put your tanks in-ground.
The good news is that fish tanks can be located on or above ground – and there are a couple of ways that this can happen.
- Sump Tank System
- Constant height – one pump (CHOP)
Sump Tank System
With this option, a pump is located in the fish tank. The pumping cycle is initiated by a digital timer which causes water to be pumped from the fish tank to the sand beds. The water percolates down through the sand, exits the sand bed and drains into a small sump tank.
A sump pump is located in the sump tank. A float switch triggers the sump pump once the water level reaches a certain level and the water is pumped back to the fish tank.

The benefits of this arrangement are that fish tanks can be located above ground and only a small sump tank is required.
Note: One of the prospective concerns is the energy use involved in using two pumps but neither pump is activated for more than 2 hours per day.
The disadvantage of the method is that, in the event that the sump pump should fail, the pump in the fish tank could (following several pumping cycles) pump the fish tank dry. This risk could be mitigated by installing a magnetic float switch in the sump tank so that, once it fills beyond a certain point, it bypasses the digital timer that triggers the operation of the fish tank pump.
Constant Height – One Pump (CHOP)
If for whatever reason, you would prefer to use just one pump, then the CHOP option is for you.
With the CHOP layout, the water is pumped from the sump tank up to the fish tank. This inflow displaces water forcing it up the solids lifting outlet so that it exits the fish tank and out into the sand beds. It then percolates down through the sand and then drains back into the sump tank.
The benefit of the CHOP approach is that only one pump is required and the prospective point of failure (posed by the sump pump) is eliminated.
The downside is that the sump tank has to be large enough to contain any water that drains back to the sand beds after the pump cycle is completed.

Another possible disadvantage (yet to be confirmed) is that solid wastes are delivered to the sand beds relatively intact – with the possibility that they may build up in that part of the furrow which is closest to the inflow point.
It remains to be seen whether this is an issue in practice and may also vary by the fish species in use. The composition of fish faeces varies from one species to another. Tilapia, for example, excrete long faecal strands while the output of others is shorter or more soluble.
Having determined what layout method you’ll use, it’s time to take a look at how to set up sand biofilters.
Sand Biofilter Positioning
You have three options when it comes to how you build iAVs sand biofilters.
You can put them in-ground, on-ground or above-ground.
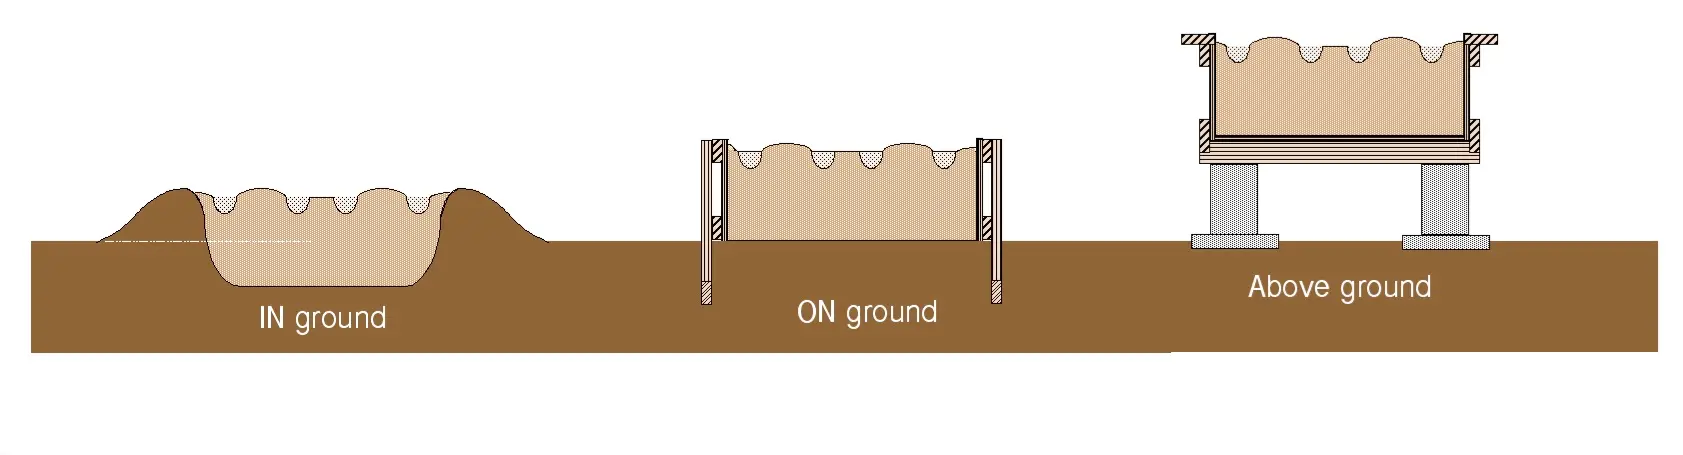
It should come as no surprise to learn that we favour the IN-ground option.
For as much as you’ve heard me speak about iAVs’ being productive, resilient and sustainable, the in-ground option is THE MOST PRODUCTIVE, RESILIENT AND SUSTAINABLE of the iAVs options. It’s also the easiest and most cost-effective way to build an iAVs.
Having revealed the best option, however, it has to be acknowledged that there are situations where the in-ground approach won’t work.
Are you in an area prone to flooding or torrential rains? Is your only available space under concrete, asphalt or paving? Would your spine and back muscles prefer that your sandbeds be at waist height?
Regardless of the motivation, you can continue to build a sandgarden but instead of making ‘cut and fill’ containments in the ground, you make a box (fish tank) and a tray (sandbed) out of whatever is available to you – on-ground or above-ground.
The only difference between the in-ground approach…and its on-ground and above-ground variants…is more work and the added cost of the containments for the fish and the plants.
The added construction cost aside, it’s still an iAVs in terms of its footprint and capabilities.
In some situations, the added cost may even be reconciled by added convenience and/or operator comfort. For example, sandbeds might be raised above the ground to permit wheelchair access.
Now, that we’ve determined what layout we need, it’s time to look at some iAVs designs.
Square Metre, Starter or Carpark Model?
Since all iAVs systems operate in essentially the same way, our ‘designs’ – are differentiated from each other by size.
- Square Metre
- Starter
- Carpark
Square Metre iAVs
A square metre is a space – a footprint – upon which many iAVs metrics are based. For example, we think in terms of so many plants per square metre…and later we’ll be talking about feed rates per square metre. The point is that it’s a useful size upon which to base our smallest design.
The Square Metre iAVs is a small demonstration unit that features a one-metre by one-metre sand biofilter with a depth of around 330mm…and a total footprint of two square metres…one for the sand biofilter and one for the fish tank.
We believe that the Square Metre iAVs is probably the smallest viable unit for practical purposes…and the fish tank is as small as we’d really want to go on animal welfare grounds – while still being able to feed at realistic levels.
That said, this is not a toy. It’s a fully functional square metre of iAVs territory – intended to replicate the behaviour of larger units, It’s a demonstration unit, a learning aid, and a seedling propagator. The effort spent in building the Square Metre iAVs will repay itself many times over.
It’s also very convenient when it comes to reporting outcomes. With an eye on the future, we’ll be encouraging square-metre system builders to join us to compare their systems and results.
Basic Shopping List
- Sand biofilters – 3 linear metres of 2-metre-wide liner for the sandbed.
- A water pump – you’ll need the smallest submersible pond pump that you can find with a 19mm (3/4″) outlet. Anything smaller than this is a maintenance nightmare. It will be capable of moving more water than we need but we can throttle the outflow without issue. In any case, the extra capacity will allow for expansion if you decide you want to build more square metre units in the near future.
- A digital recycling timer – programmable for short intervals (one minute or less) at least eight times in any 24-hour period.
- 3 metres of 20mm (3/4″) plastic potable water hose – and the necessary fitting to connect it to the water pump.
- 330 litres of silica quartz sand.
Note: I’ve deliberately avoided mentioning brand names since they will vary between locations.
System Productivity
The question of what can be grown in a single square metre is an interesting one. Theoretically, based on the production of the carpark iAVs, it should be capable of producing up to 80kg/year. We really have no idea of what the upper limits look like at this stage. In any case, we can think of it as a benchmark.
Now, if you decided to build your system over time…for resource reasons…you could simply continue replicating square-metre biofilters…one at a time…as resources permit. When you have six such units in play you would have the equivalent of a Starter iAVs – 6 square metres.
Starter iAVs
If you require no more convincing that iAVs is able to provide you with clean fresh organic food, then you might consider a Starter iAVs for your first build.
Basic Shopping List
- Liners…8 lineal metres of 2-metre-wide liner for the sandbed…and a 4m by 4m liner for the fish tank.
- A water pump – with a capacity of 1200 litres per hour at a developed head height of 1.0 – to 1.5 metres.
- A digital recycling timer – programmable for short intervals (one minute or less) at least eight times in any 24-hour period.
- 8 metres of 20mm plastic potable water hose – and the necessary fitting to connect it to the water pump.
- 2 cubic metres of washed and graded silica quartz sand.
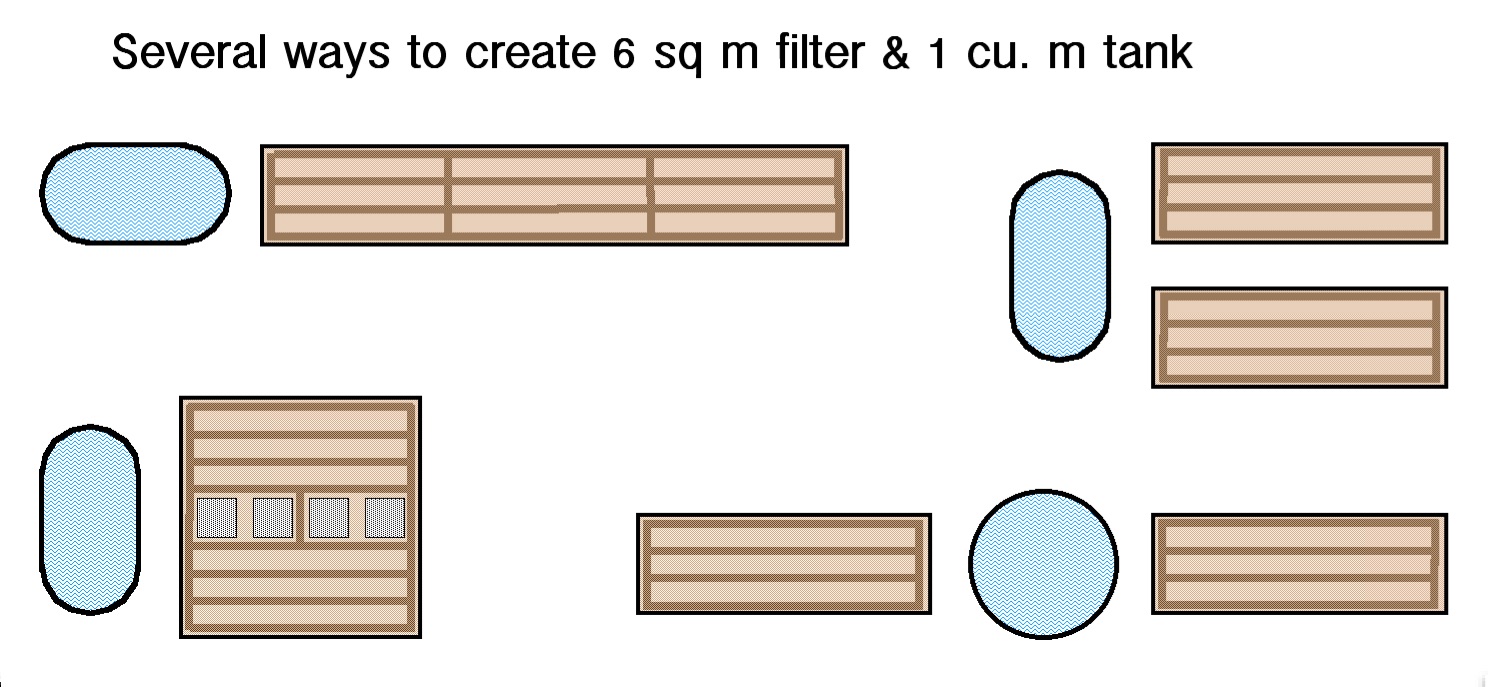
System Size and Productive Capacity
With these few components, we’ll build an iAVs sandgarden with a 1,000-litre fish tank – and six square metres of sandbed – containing two cubic metres of sand – weighing about three metric tons. It will occupy a total footprint of around 8 square metres.
Managed according to iAVs guidelines, a system of this size will enable you to grow 350kg+ of fresh fruit and vegetables and 50kg+ of freshwater fish per year – a nutritious diet for a single person.
Carpark iAVs

This was the American ‘carpark’ model – where big gas guzzlers are the norm. Our version will reflect the international move toward smaller vehicles.
The new Carpark iAVs comprises 18 square metres of growing space and three cubic metres of fish tank capacity.
It will feature a 3,000-litre fish tank – and 18 square metres of sandbed – containing six cubic metres of sand – weighing about nine metric tons. It will occupy a total footprint of around 28 square metres.
Basic Shopping List
- Sand biofilters – 25 linear metres of 2-metre-wide liner for the sandbed – assumes the use of rows.
- A water pump – a pump with a capacity of around 3000 litres per hour at an operating head of 1.0 – 1.5m is required.
- A digital recycling timer – programmable for short intervals (one minute or less) at least eight times in any 24-hour period.
- 3 metres of 25mm (1″) plastic potable water hose – and the necessary fitting to connect it to the water pump.
- 330 litres of silica quartz sand.
The basic shopping list is also impacted by how you set up your sand biofilters as rows – or as one large one – and how you water and drain the biofilters. The further you venture from the in-ground version, the greater the capital requirement.
System Size and Productive Capacity
Built and operated within iAVs specifications, the Carpark iAVs will produce not less than 1400kg of clean fresh organic fruit and vegetables – and 200kg of fish – per year.
Which One?
All three of the system layouts that we have presented are authentic iAVs. It all comes down to your needs, preferences and resources.
It would be better to build the square-metre iAVs if it means you can start sooner…like now!
Any inhibition on your part will quickly give way to excitement when you experience the method directly…and the resources that you invest in a square-metre iAVs will provide a dividend very quickly. Not only will you be experiencing iAVs at a fully-functional and practical level but it will make a perfect seedling propagator when you elect to scale up to larger units.
Do you want to grow food for yourself? Do you want to grow food for others? Do you want to grow commercially?
Key Points
- Each of the three systems operates in the same way. The only thing that changes is the variable cost of the components and operating expenses – from one square metre – to 6m2 – to 18m2 – to a million square metres.
- Each of the three systems exhibits a 1:2 ratio of fish tank volume to sand biofilter volume. A Square Metre iAVs utilises 170 litres of water and 330 litres of sand. A Starter iAVs utilises 1000 litres of water and 2 cubic metres of sand. A Carpark model utilises 3000 litres of water and 6 cubic metres of sand.
Task List
- Choose which of the three systems will be your first build.
- Develop a materials list – based on what is available in your location.
- Google to determine where your components can be sourced.
- Calculate the cost of your proposed system. You need to know how much you’ve invested if you’re going to know your return on investment.
Leave a Reply
You must be logged in to post a comment.